Import from iPhone, iCloud, OneDrive, and Google Drive
Keeping your important documents and photos secure and organized is easy with eLifeVault. Whether your files are stored locally on your iPhone or in cloud storage (iCloud Drive, OneDrive, or Google Drive), you can quickly import them into eLifeVault in just a few steps.
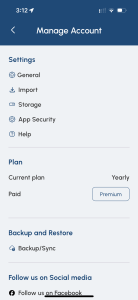
Importing Files from Your iPhone
- Open eLifeVault on your device.
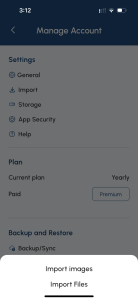
- Go to the category where you want to store the file, or open your account settings and tap Import.
- Choose Import Files.
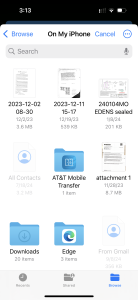
- Your iPhone’s file browser will open. From here, select the file you want to upload.
- Your chosen file will now be securely stored in eLifeVault under the selected category.
Importing Files from Cloud Storage
eLifeVault also connects seamlessly with popular cloud services, making it easy to pull in files from anywhere.
- In the Import Files screen, tap the locations icon at the bottom
 right.
 - Choose from available cloud storage options such as:
- iCloud Drive
- OneDrive
- Google Drive
- Select the service and browse to the file you want to import.
Once imported, your file will be saved inside eLifeVault, ready whenever you need it.
Why Use eLifeVault for File Storage?
Importing files into eLifeVault gives you peace of mind:
- ✅ Stay organized by category – no more endless scrolling to find what you need.
- 🔒 Secure storage options – locally or in the cloud, depending on your plan.
- 📱 Access anytime, anywhere – your important documents are always just a tap away.
With eLifeVault, managing important records doesn’t have to be stressful. Whether it’s family documents, school records, insurance papers, or business files, you can import and store them safely in one place.
Importing Example Images in Order
In this example 1) go to Account, 2) Select Import, 3) Select Import Files, 4) import from files, or 5) any of the cloud storage you use.